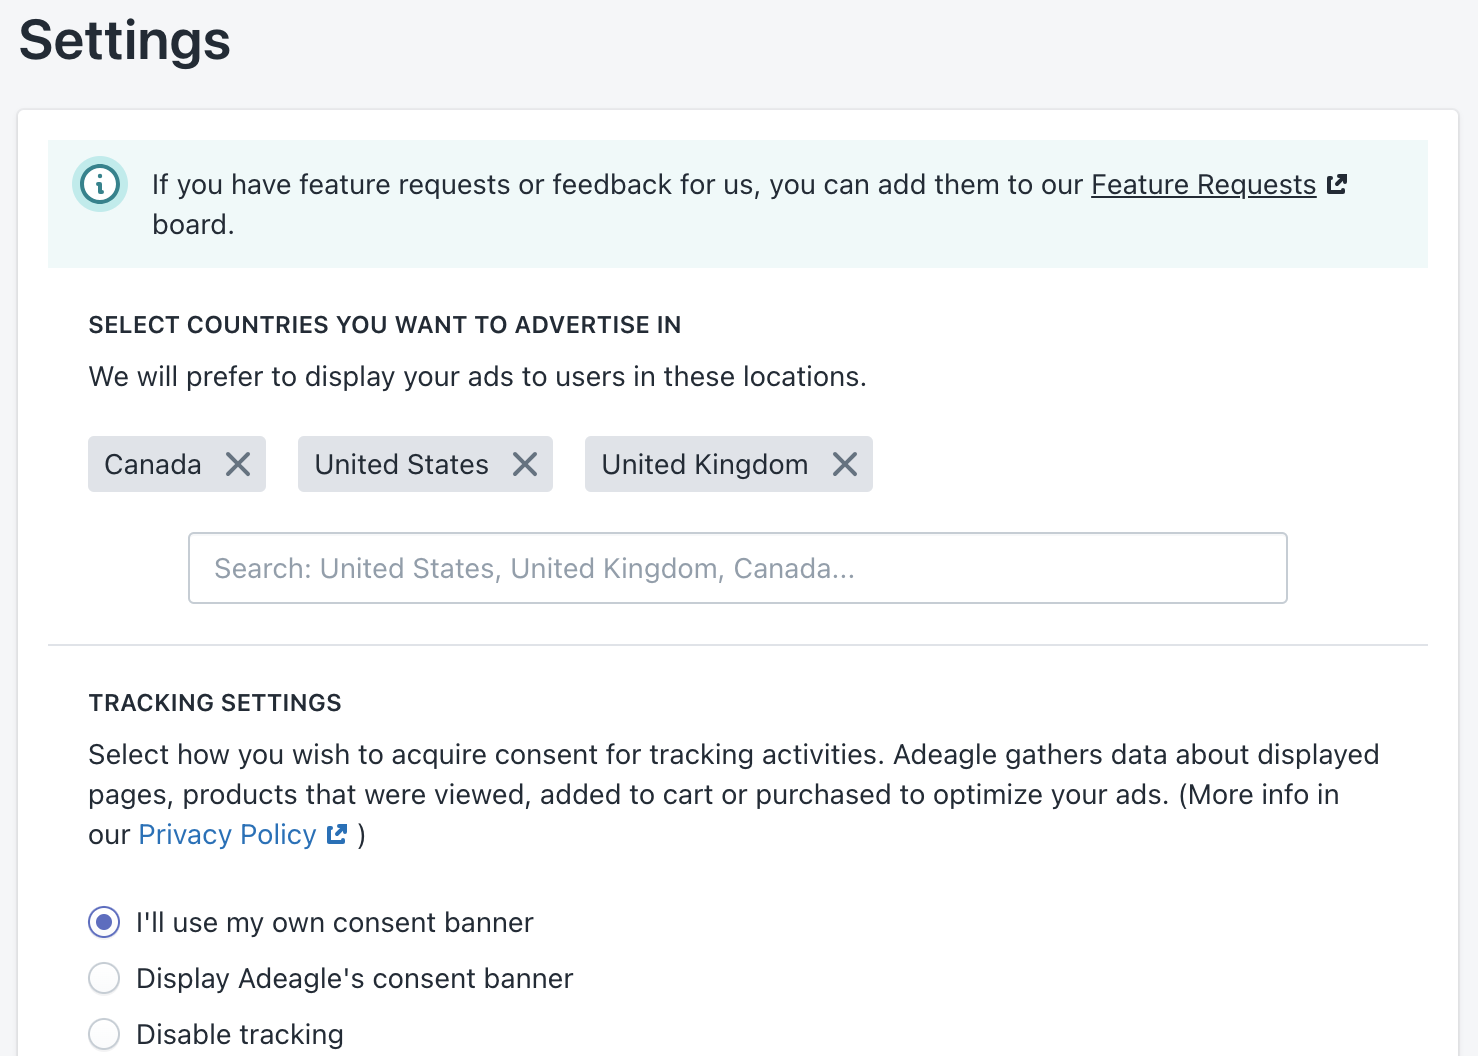
The Settings section in Adeagle allows you to configure various options that impact all your campaigns across the app. These settings ensure consistency and define how your Shopify store is interacting with Adeagle. Let’s explore each section in detail:
1. Select Countries You Want to Advertise In:
- This setting determines the countries in which Adeagle will prefer to display your ads.
- For instance, if you specify that you want to display ads in the United Kingdom (UK), they will appear solely on British websites.
- However, keep in mind that occasionally, users from other countries might visit British websites and click on your ad. This can happen because some Shopify stores offer international shipping. Then, this user will land on your website.
- While such occurrences are minimal, it’s essential to be aware of this cross-border interaction.
2. Tracking Settings – Acquiring Consent for Optimization:
- Adeagle collects data about displayed pages, viewed products, items added to the cart, and purchases to optimize your ads. More details can be found in our Privacy Policy.
- You have three options in regard to acquiring consent related to tracking activities:
- Use Your Own Consent Banner:
- If you prefer to gather consent independently, choose this option.
- Ensure that you inform your users about the data Adeagle collects. Detailed information can be found in our Privacy Policy.
- Display Adeagle’s Consent Banner:
- Opt for this option, and Adeagle will display a consent banner on your website.
- We’ll take care of gathering consent for you, simplifying the process.
- Disable Tracking:
- If you decide to opt out of data collection and user tracking by Adeagle, select this option.
- While this preserves user privacy, keep in mind that we won’t be able to optimize your campaigns based on behavioral data.
- Choose wisely based on your specific needs.
- Use Your Own Consent Banner:
The rest of the settings are specific to Standard Plan and can only be accessed within the Settings section if you are on this plan. These settings specifically relate to how you choose to display ads in your store, and you only need to display ads in your store on the free plan.
3. Enable Ads on Your Website:
- Connecting to the Adeagle Ad Network allows you to display Adeagle Ads within your shop.
- By participating in the ad exchange, you can showcase your products in other stores as well.
- Important note: If you’re on the free plan, you must display ads in your store for your Adeagle campaigns to be active.
- In order for your campaigns to be active, you need to activate at least 1 out of 4 available ad types.
- You have the flexibility to enable or disable ads at any time.
- If you prefer not to display ads on your website but still want to be featured in other stores, websites, and apps, consider upgrading to one of the Advanced Plans.
Types of Ads You Can Enable:
- Topbar Ads:
- These ads appear in a minimalistic format at the top section of your store.
- Native Ads:
- Designed to seamlessly fit into the bottom section of your website, native ads blend harmoniously with your content.
- Banner Ads:
- Displayed as an additional customizable block in the bottom section of your store.
- Notification Ads:
- These slick little notifications slide into the bottom corner of the screen and disappear after a few seconds.
Preview and Enable Ads:
- Click the ‘Preview’ link for each ad type to see how it will appear.
- To activate an ad type, click the ‘Enable’ button next to it.
4. Set Ads Frequency (Topbar and Notification Ads Only):
- Choose how often ads will be shown on your site.
- Keep in mind that if you participate in the ad exchange, displaying more ads means your products receive greater visibility in other stores as well.
- Select from the following frequency options:
- Maximum: Around 90% of impressions of your store will include an ad.
- High: Approximately 70% of impressions of your store will feature an ad.
- Normal: About 50% of impressions of your store will display an ad.
- Low: Roughly 30% of impressions of your store will show an ad.
- Minimum: Around 10% of impressions of your store will have an ad.
5. Customize Ads on Your Website:
- Tailor how ads are displayed on your website to align with your brand and user experience.
- Here are the customization options available:
- Ad Block Title:
- The default title is ‘You May Also Like’, but you can change it to anything that better suits your store’s style and messaging.
- Banner Ads Customization: For Banner Ads, you have the following settings that can be customized:
- Theme Color: Choose a color that resonates with your brand identity.
- Font Color: Adjust the font color to ensure readability and consistency.
- Border Color: Define the border color for a polished look.
- Ad Block Title:
- Feel free to experiment with these colors and the block title to better match your store’s color palette and overall design.
- You can also reset these settings to the default ones by clicking on the ‘Reset to default’ button below.
6. Exclude Ad Categories:
- If certain ad categories don’t align with your store’s content, you can choose to exclude them from appearing on your website.
- By doing so, these specific types of ads will no longer be featured on your site.
- Keep in mind that displaying more ads increases the visibility of your products in other stores.
Remember to Save Changes
After adjusting any of these settings, click the ‘Save’ button in the top right corner to ensure your preferences are applied.