
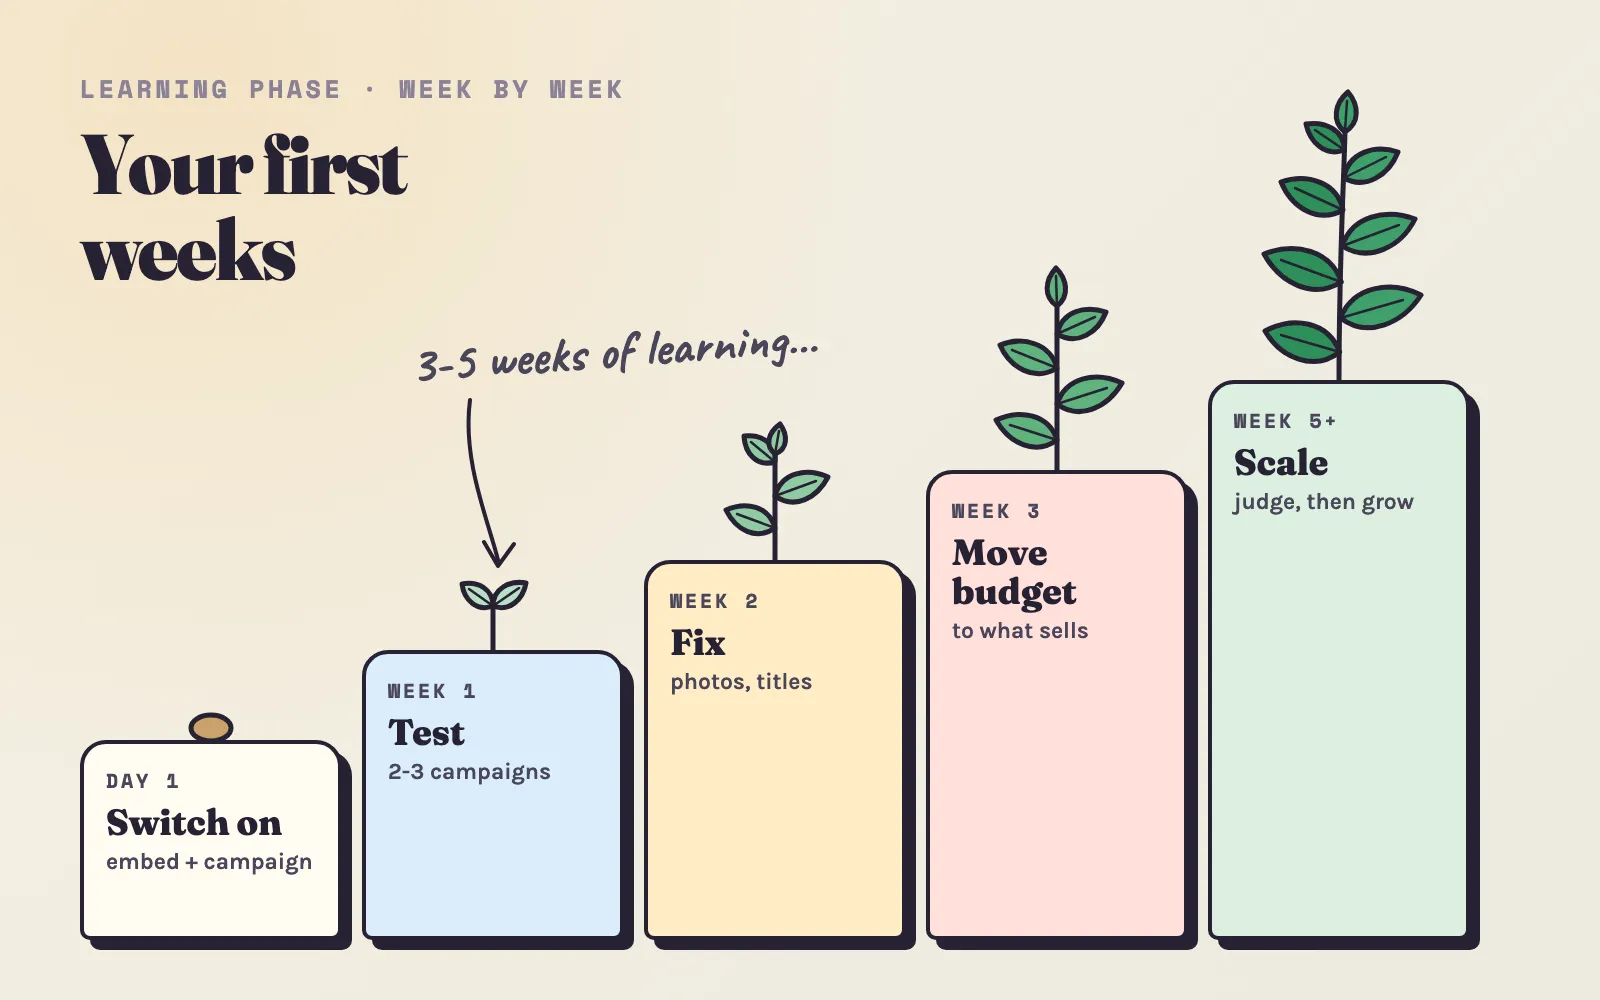
The first weeks with a new ad channel often feel slow. Impressions go up and the first clicks come in, but orders take longer. This is normal. Some things only come with time: data, traffic and a retargeting audience. Other things you can do from the first day, and they make a big difference to your results later.
This guide goes through your first five weeks with Adeagle, one at a time: what to set up, what to test, what to fix, and what to leave alone. It also shows real data from Shopify stores on why traffic matters so much, and when the first sales usually come.
- Switch on. The app embed, your first campaign, your plan and budget.you
- First impressions and first visitors. Check that the ads run and how they look.you
- Give it more to learn from. Add two or three campaigns - other collections, or the same products with other categories and interests.you
- The learning phase. At least three weeks, sometimes up to five. Adeagle tests websites, apps, audiences and formats; your retargeting audience fills up.let it run
- Read the first CTRs. Fix products and ads that few people click.you
- Move budget toward what works. Raise the winners and retargeting, lower the weakest.you
- First orders become realistic. Visitors come back for a second look.let it run
- Judge and scale. Four weeks of numbers are enough to decide.you
What you control - and what needs time
It helps to know from the start which levers are yours. Everything on the left you can change today. Everything on the right gets better only with time, traffic and clicks.
You control
- Which products you advertise, and together with which.
- How they look in the ads - the image, the title and the price, in Product Feeds.
- Who sees them - page categories, shopper interests and countries, per campaign.
- How many campaigns you test against each other.
- Priorities of single products and ad formats.
- The budget - in total, per campaign, and for retargeting.
- Your store - product pages, shipping costs, reviews, speed.
Needs time and data
- Which websites, apps and placements work for your products.
- Which shoppers click and buy - the audiences.
- When and where your ads get the most attention.
- Which ad formats and sizes work best.
- Which product sells best to which audience.
- Your retargeting audience - it is made only of your own visitors.
- The shoppers who buy on their second or third visit.
Before anything else: traffic sets the pace
Every decision in this guide is a comparison - this campaign against that one, this photo against the old one. A comparison needs enough visitors and orders to mean something. So before the week-by-week plan, look at the math that sits under every Shopify store.
The average Shopify store turns about 1.4% of its visits into orders, and the top 20% of stores pass 3.2% (Littledata benchmark). So one order takes about 70 visitors, on average. With few visitors, chance decides a lot: a store with 20 visitors a day gets about one order every three or four days - and some weeks none at all, even when nothing is wrong.
We looked at how regularly real stores sell:
Two more numbers from the same stores:
- The median store had 6 orders a month. If your store is there, you are normal - and your next step is more visitors, not a new theme.
- A whole week with no order is normal for small stores. It happened in 4 months out of 5 for the stores with 6-15 orders a month (about 15-35 visitors a day), in 1 month out of 3 at 16-30 orders, in 1 out of 5 at 31-60, and in only about 1 out of 30 at 61-120 orders (about 145-285 visitors a day).
That is why we say: aim for at least 100 visitors a day, from all your channels together. At 100 a day and an average conversion rate, orders come on most days, a quiet week is rare, and every test you run gives you an answer in a week or two instead of a month. Try your own numbers:
- Orders a month
- 42$3,360
- Days with an order
- 75%of all days
- A week with no order
- under 0.1%chance, any given week
Orders on most days. A change you make now shows in your numbers within a week or two.
How to get to 100 visitors a day
You do not need all of them from one place. Add up what your channels bring:
- Raise your Adeagle budget. On the Essential plan a visitor costs about $0.13 on average (August-September 2026, real visitors only), so every $100 of monthly budget brings roughly 750 visitors - about 25 a day. Check other channels with the CPC calculator.
- Free channels. List your products on Google for free with Shopify’s Google & YouTube app, post short videos of your products in use, pin them on Pinterest, and help in the communities where your buyers talk. Our guide to getting your first sales has the steps for each.
- Your other paid channels. Social and search ads bring visitors too. Adeagle’s retargeting can then bring back the ones who did not buy, wherever they came from - see how to advertise your Shopify store.
- Email. A sign-up form with a small first-order discount turns one-time visitors into people you can invite back for free.
Day 1: switch on the three basics
1. Switch on the Adeagle app embed. In the onboarding - the short setup when you first open Adeagle - Enable Adeagle in your store opens your theme editor with the embed already on - you only click Save. (Later: Online Store > Themes > Customize > App embeds.) The embed is what lets Adeagle see which products your visitors view, add to cart and buy. Without it, Adeagle cannot count your sales, cannot learn from your visitors, and - most important in the first weeks - cannot build your retargeting audience. Every visitor before the embed is on is a visitor you can never retarget, so do it first. If you ever change or update your theme, check the embed again: it is switched on per theme. Adeagle checks it every day and reminds you when it is off.
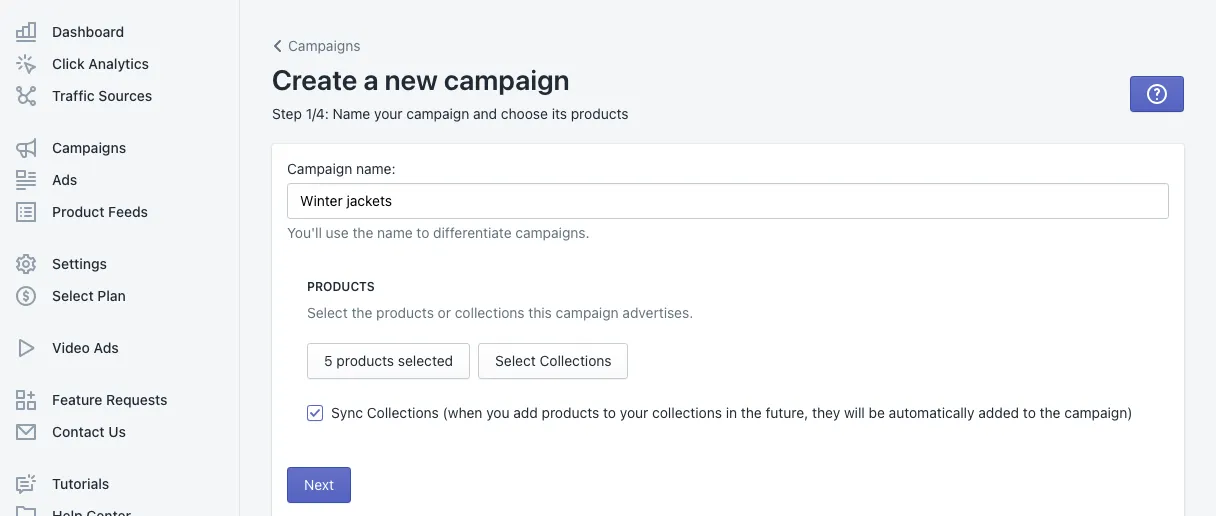
2. Create your first campaign. The wizard takes a few minutes - Create your first campaign walks through every screen. For the first one, three tips:
- Start with products that already sell or that have your best photos. The learning goes faster when the ads have something good to show.
- Pick the page categories that really describe your products, and three to five interests your best customers share. More on both in 300+ page categories and 600+ shopper interests.
- Choose only the countries you ship to. A click from a country you cannot deliver to can never become an order. If you ship worldwide, leave the Countries field empty - the campaign then advertises everywhere.
3. Choose your plan and budget. On every paid plan, the price you choose is your monthly ad budget. When you first open Adeagle, the onboarding asks a few questions about your store and recommends a plan and budget. Two things to know: retargeting - showing your products again to visitors who did not buy - comes with the Professional and Ultimate plans, and a budget that is too small gives too few clicks to learn from. Compare the plans on the pricing page.
While you are at it, keep AI optimization on for your campaigns (the last step of the wizard). In the first weeks it does a lot of the testing for you.
Days 2-3: check that everything runs. You should see the first impressions and clicks on the Dashboard. Nothing after two days? Check that the campaign is Active, that the app embed is on, and that its products are active in Product Feeds. Then open Ads, click the eye icon on a few formats and look at your products the way shoppers will see them.
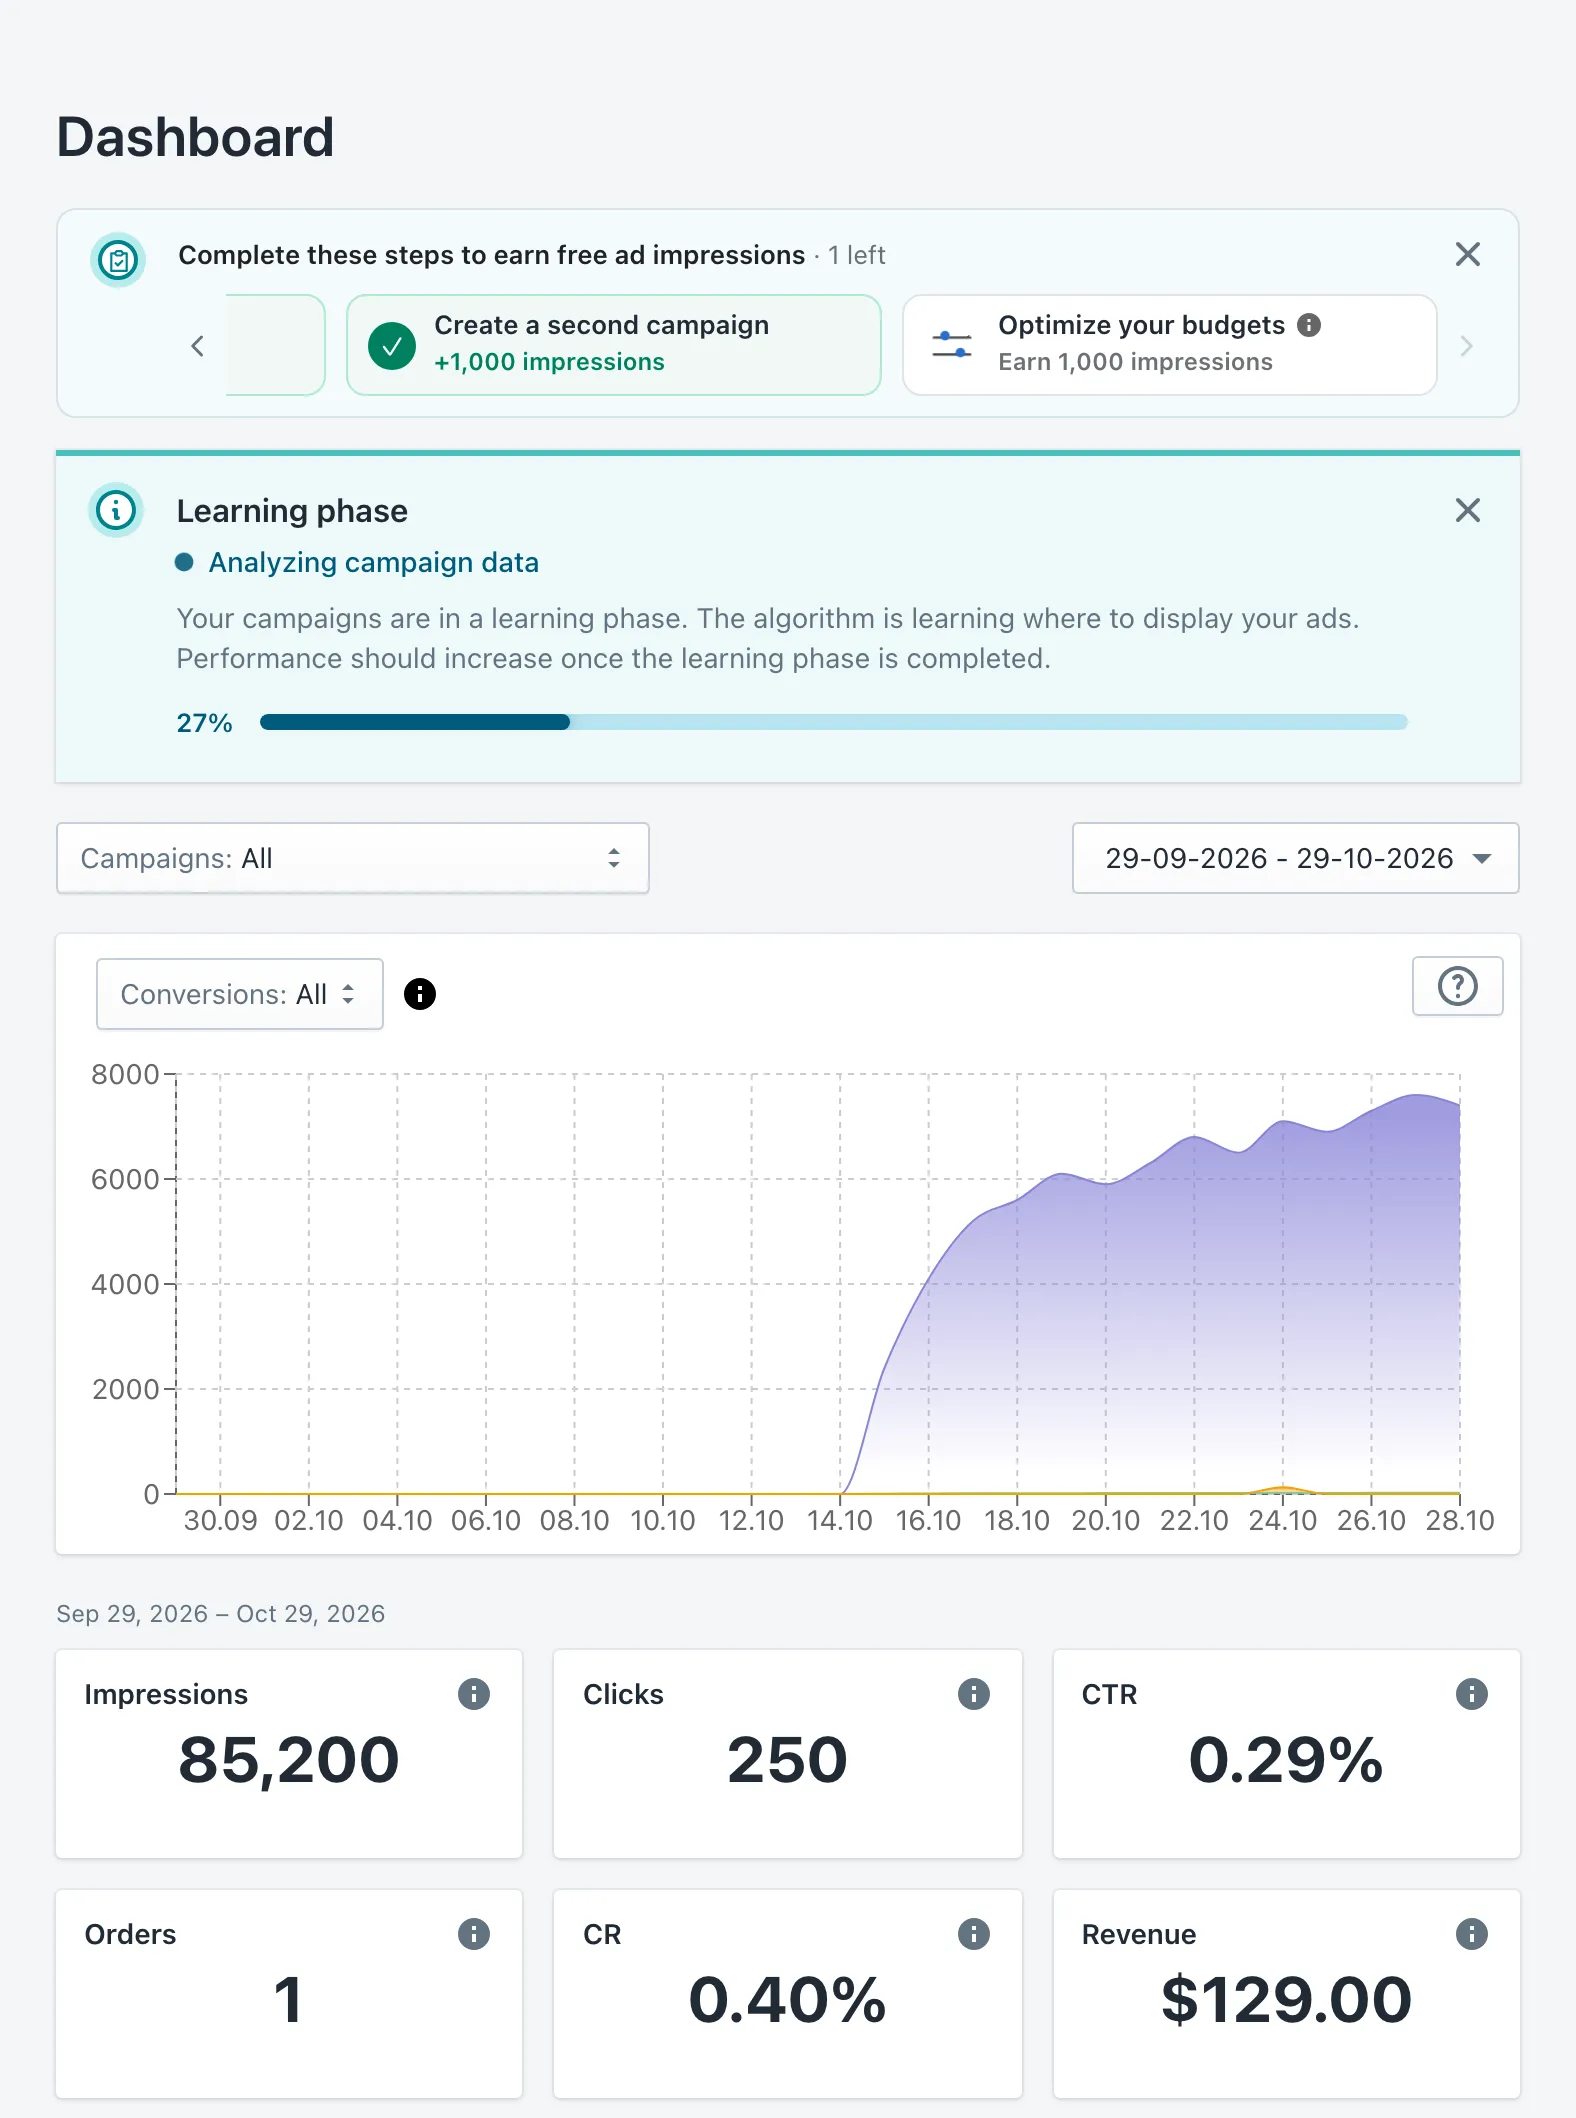
The Dashboard in week 2 of an example store. The checklist above the learning phase banner pays 1,000 free ad impressions for each step you finish - creating a second campaign and optimizing your budgets are two of them.
Week 1: give the system more to learn from
One campaign tells you how one setup performs. Two or three campaigns tell you which setup works better - and they give Adeagle more combinations to learn from at the same time. This is the most useful thing you can do in your first week.
Each campaign has two parts you can change: what it advertises - single products or whole collections - and who sees it - the page categories (what the websites are about) and the shopper interests. Build your test campaigns in one of two ways:
-
Same collection, different targeting. Choose the same collection in three campaigns with Select Collections, and give each campaign its own set of page categories and interests that belong together. A store selling jackets might try:
- Fashion and Clothing pages, for shoppers interested in Street Style and Fashion Trends;
- Camping and Clothing pages, for Camping and Outdoor Activities;
- Careers and Clothing pages, for Men’s Business Wear and Women’s Business Wear.
After a few weeks you know which kind of shopper buys your jackets - something you can use in your other channels too.
-
Different collections, same targeting. One campaign each for your bestsellers, your new arrivals and your sale collection, all with the same categories and interests. Now you learn which part of your range sells best to people who don’t know your store yet.
A few rules make the test fair:
- Test one difference at a time. Change either the products or the targeting, not both. If both change, you will not know which one made the difference.
- Keep Sync on for collections. Products you add to a collection in Shopify later join the campaign by themselves, so the test stays complete.
- Don’t split a small budget too thin. Each campaign learns from its own clicks. As a rule of thumb, two or three campaigns are plenty on a budget under $100 a month; above $200, four or five work well.
- Keep the Auto split on Evenly for now. In Edit Budgets, Evenly gives every campaign the same share, so the comparison is fair. Switch to By performance later, when you have results.
- Name campaigns by what you test, such as Jackets · Outdoors, so the Campaigns table reads like a test report.
What not to do in week 1: pause campaigns after three days, change the targeting every day, or judge anything by orders. It is simply too early - the orders have not had time to come yet.
Week 2: read the first CTRs and fix what few people click
After about two weeks, your products and ad formats have enough impressions for the first comparisons. The number to look at now is CTR - click-through rate, the share of ad views that end in a click. It tells you whether your ads catch attention. Across Adeagle ads, the average CTR is 0.29% (August-September 2026, real clicks only); compare yours with other channels in the CTR calculator.
Wait for enough impressions. At a 0.3% CTR, 1,000 impressions bring about three clicks - one click more or less changes the CTR by a third. Judge a product or an ad format after about 5,000 impressions - at an average CTR that is about 15 clicks, enough to see a real difference. Compare it with the others in the same campaign, not with other stores. With a smaller budget, or many products in one campaign, this can take longer than two weeks.
Fix the products with a weak CTR
Open Product Feeds, pick a campaign and look at the CTR column. Click a column header to sort.
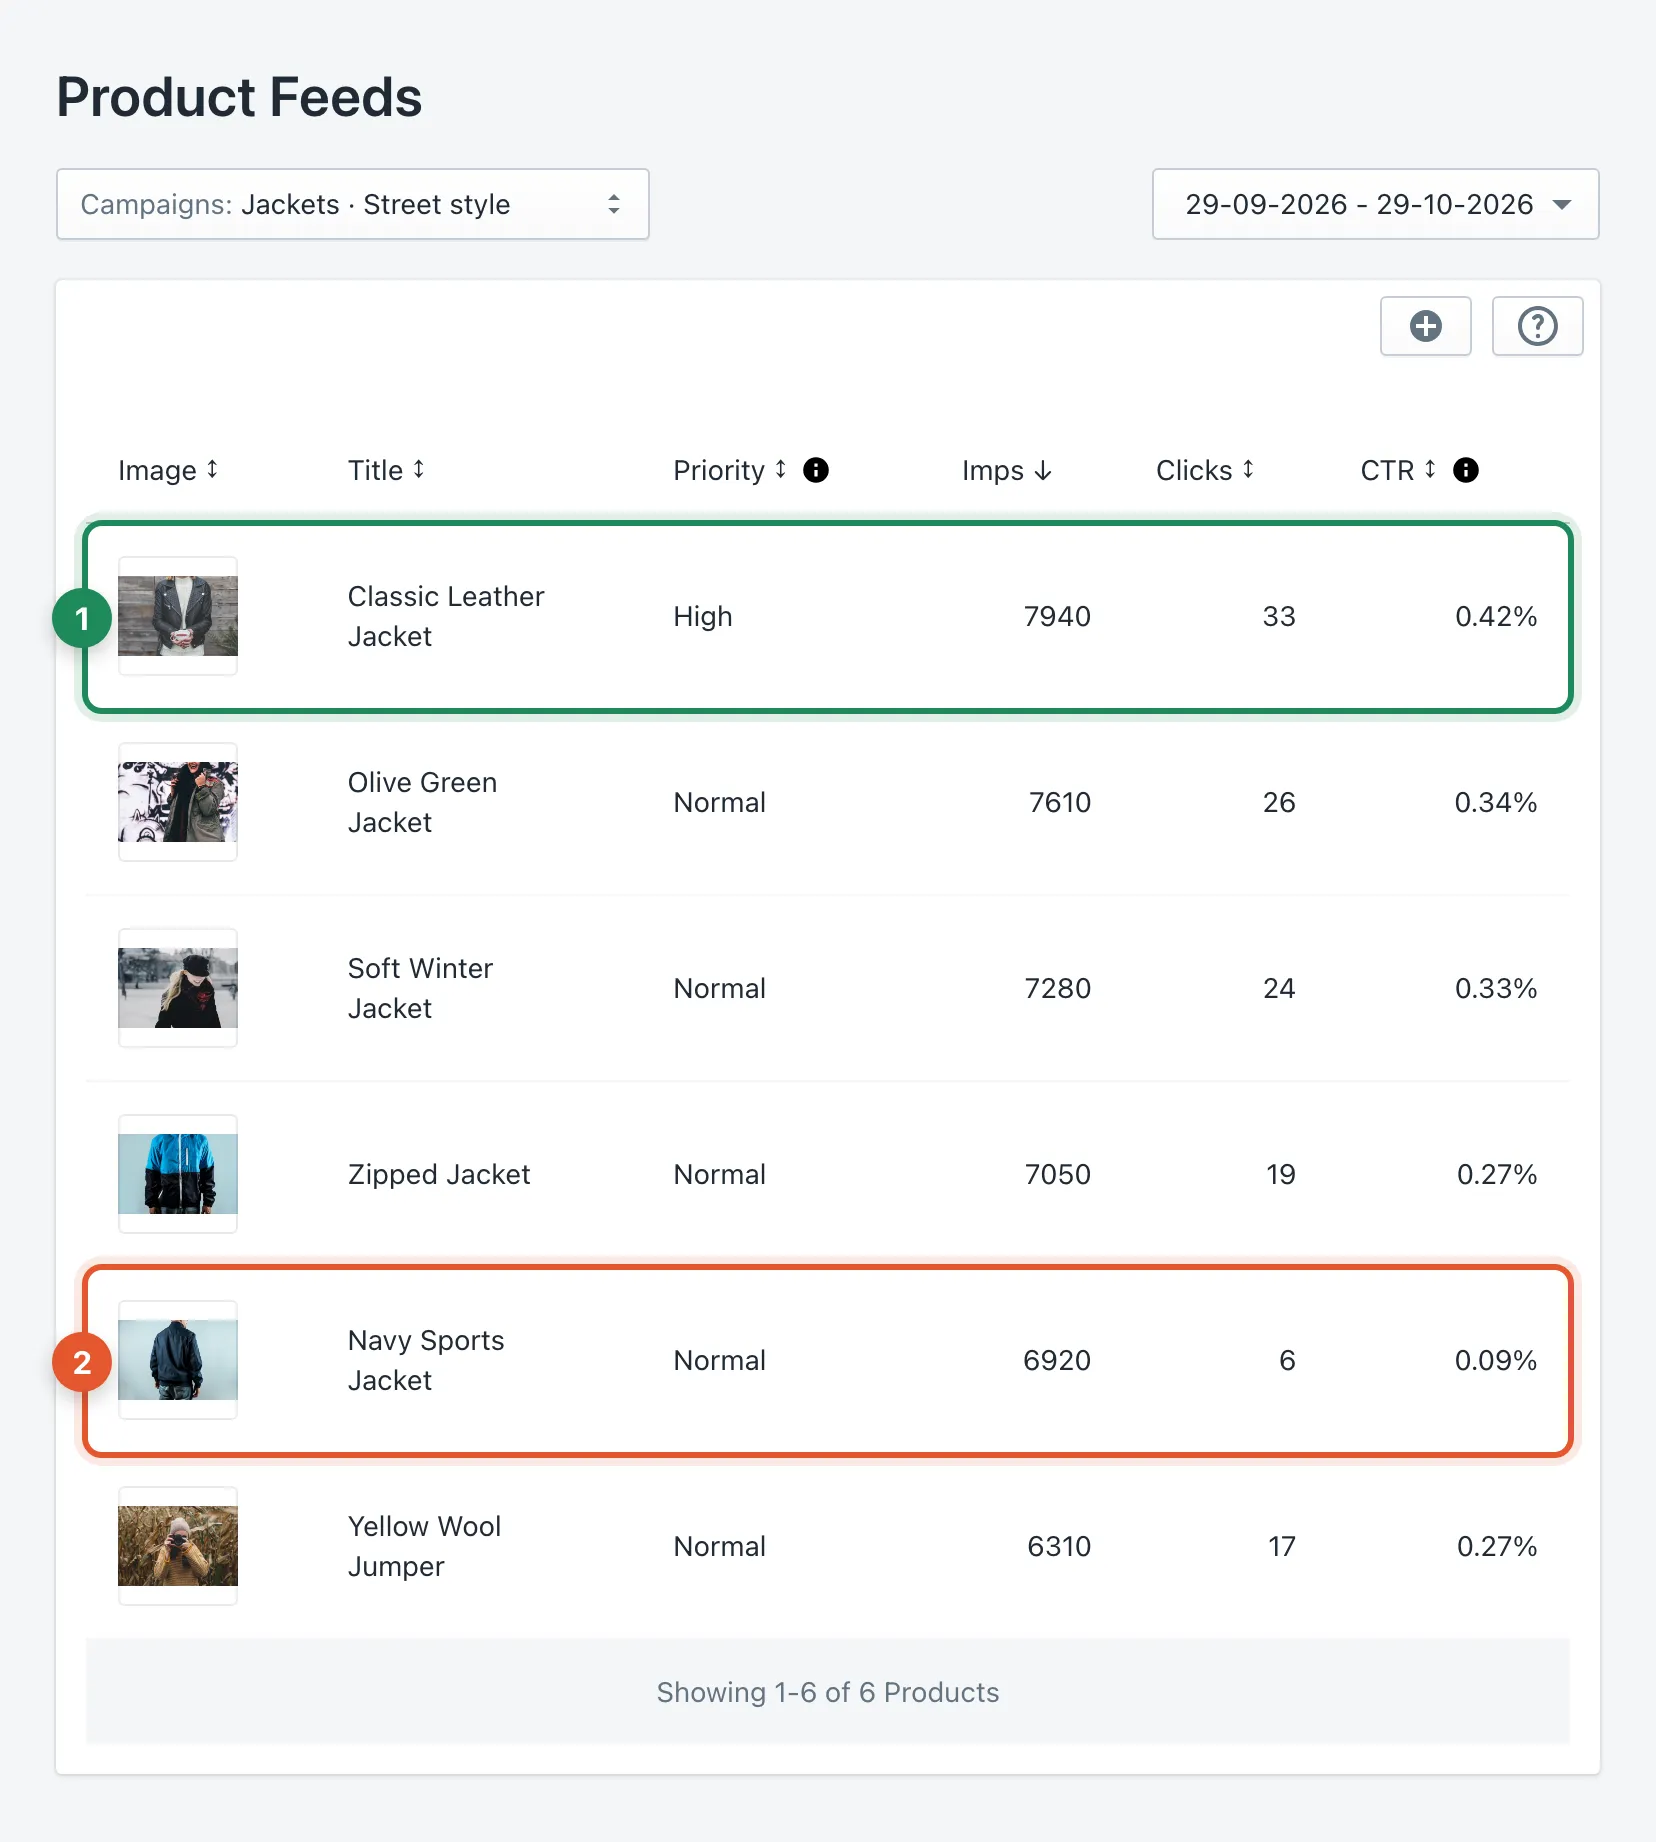
In this example, (1) the leather jacket gets the most clicks, so it already has High priority - it gets more of the campaign’s impressions. (2) The navy jacket has the same number of impressions as the others, but only a third of their CTR. Its ad is not doing its job. Click the pencil next to it:
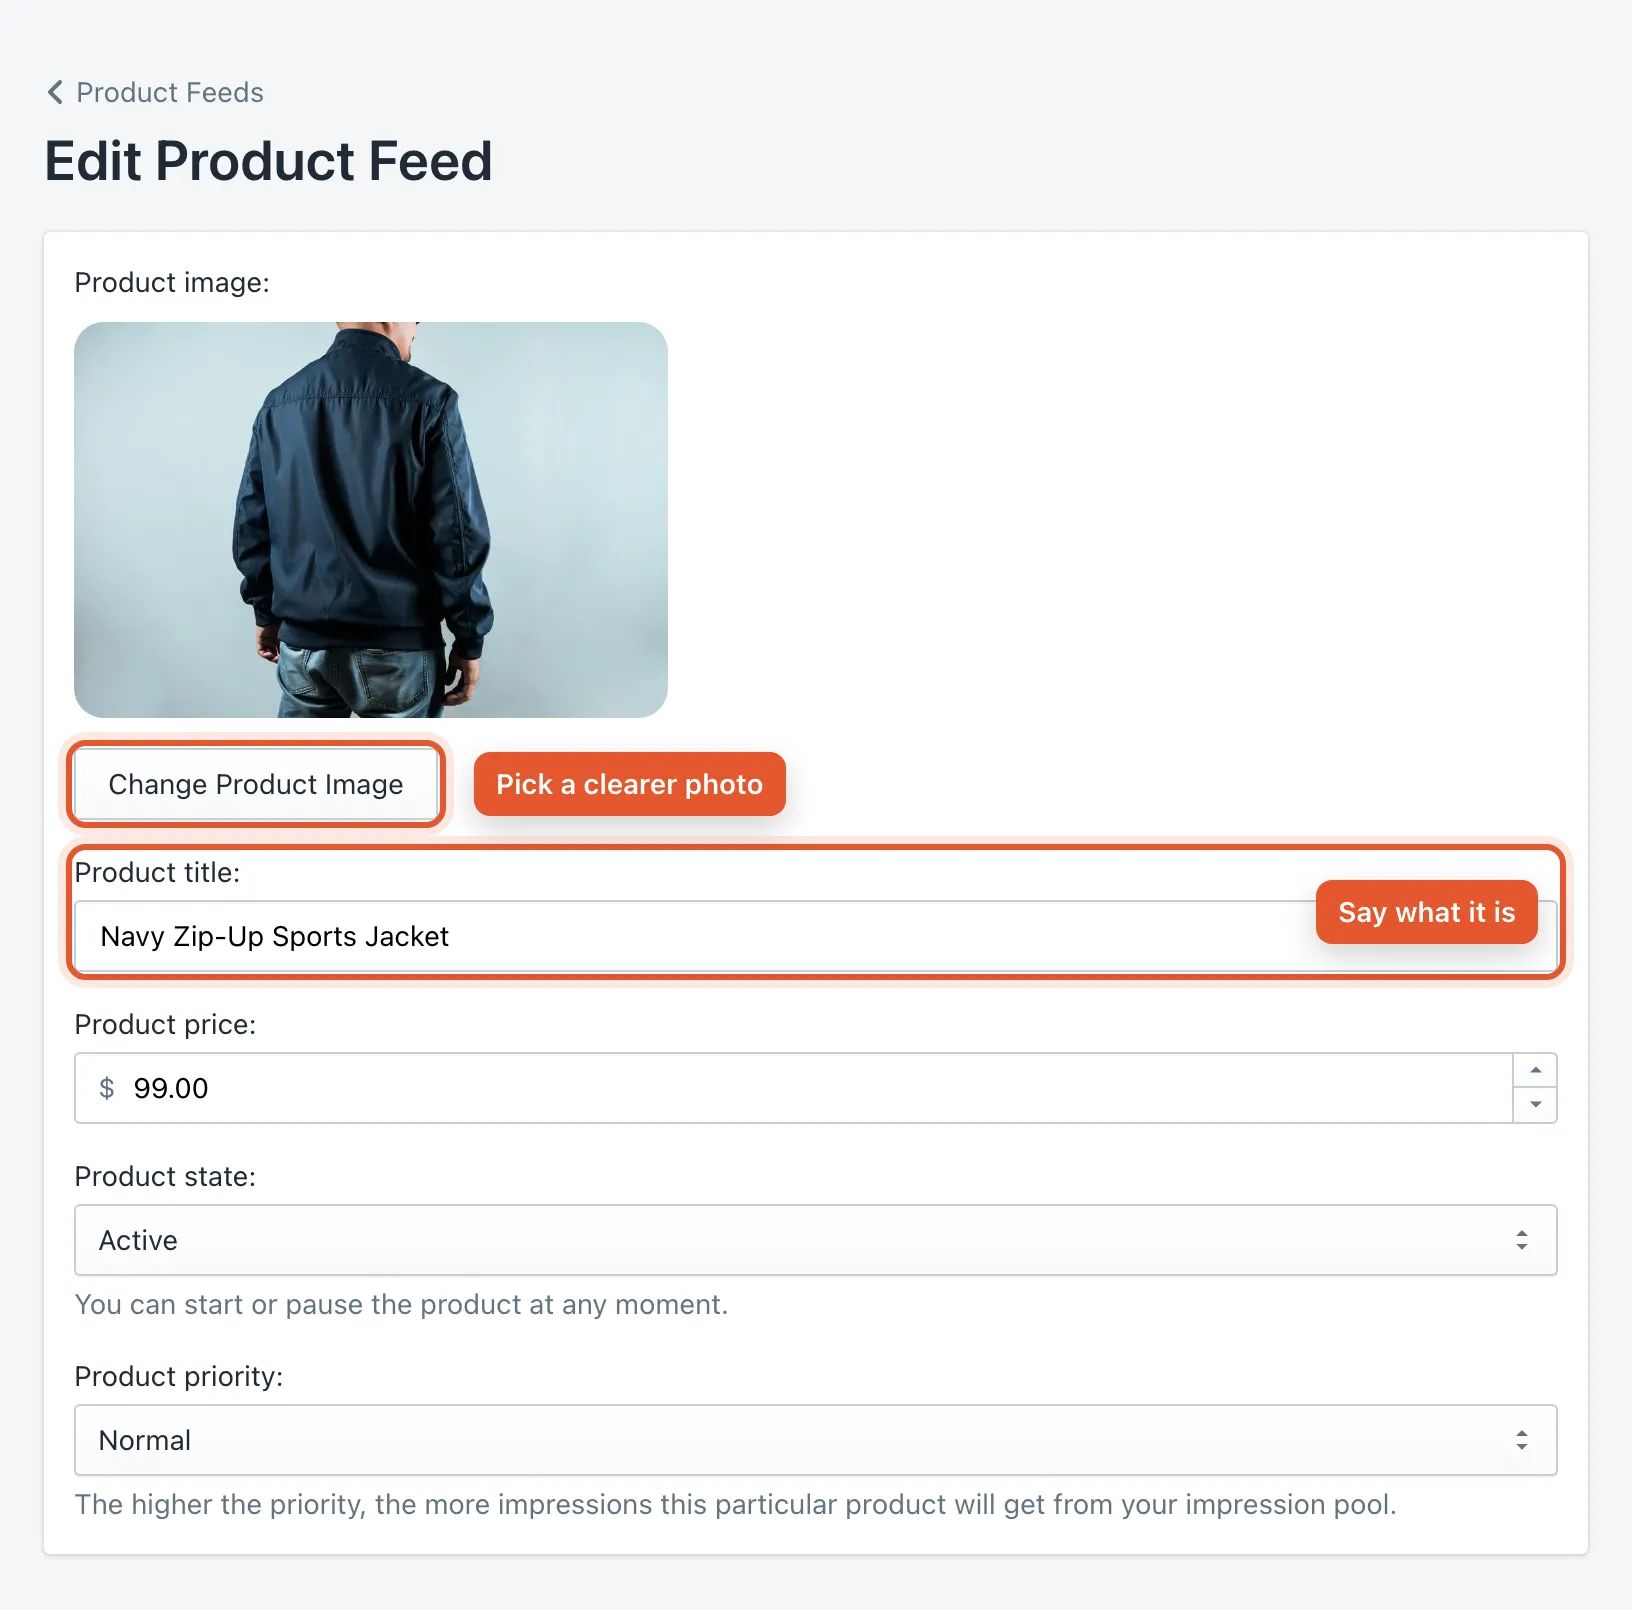
Here you can change three things - for your ads only; your Shopify store stays as it is:
- The image. Change Product Image lets you pick another photo of the same product (add better photos to the product in Shopify first, if you need them). The photo in this example shows the jacket from behind - a shopper scrolling past sees a back, not a jacket. What usually gets more clicks:
- the product from the front, filling most of the picture;
- a plain, light background, or the product in use when that explains it better (clothes on a person, a lamp in a room);
- no text, frames or collages on the photo - the ad adds the title and price;
- a photo that still works small. Many ads are as small as a phone banner, so look at it at thumbnail size.
- The title. Short and clear: what it is, plus one detail that matters - Navy Zip-Up Sports Jacket, not The Explorer – FW26 Edition. Leave out codes, emoji and capitals. Use the words a shopper would search for.
- The price. Keep it the same as in your store. A shopper who clicks a $79 ad and lands on a $99 page leaves. If you run a sale, update it here too.
Change one thing, give it a week, and compare again. If a product is still far behind after two changes, pause it - or try it in its own campaign with other interests. Sometimes the product is right and the audience is wrong.
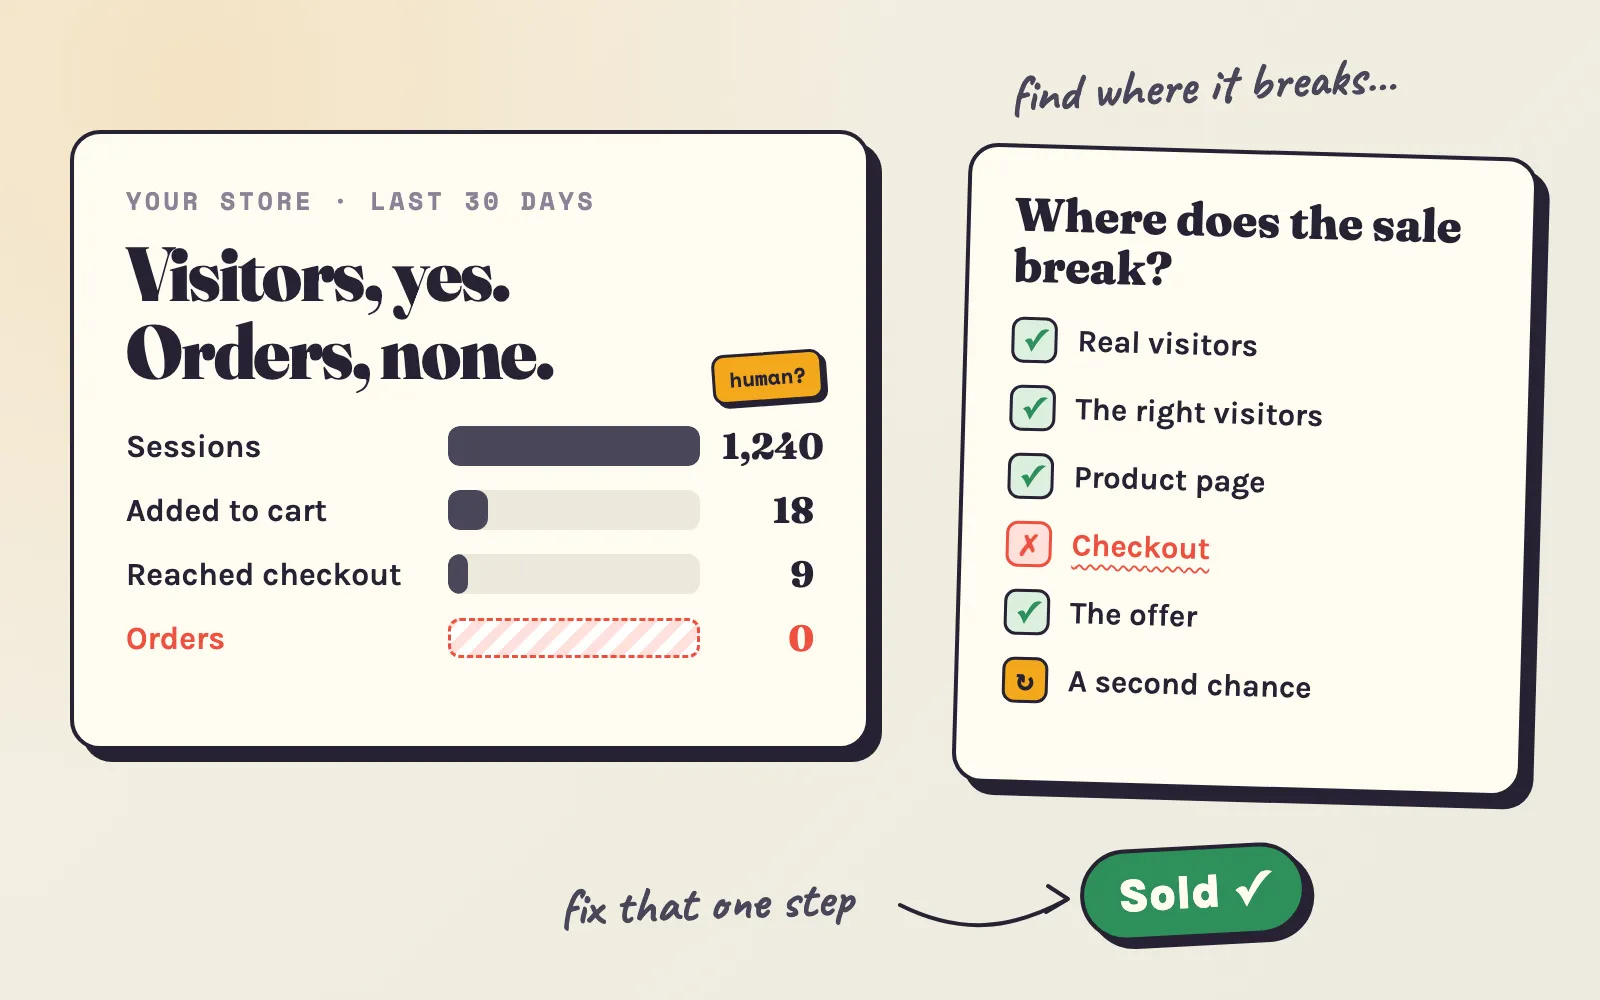
Many clicks but no orders? Then the ad works and the store does not convince - a price, shipping cost or product page problem. Our conversion rate guide has a leak finder for exactly this.
Boost the formats that work, pause the ones that don’t
Adeagle builds every banner from your products, in many sizes and formats, so your ads fit any website, app or store. The Ads section shows how each one does.
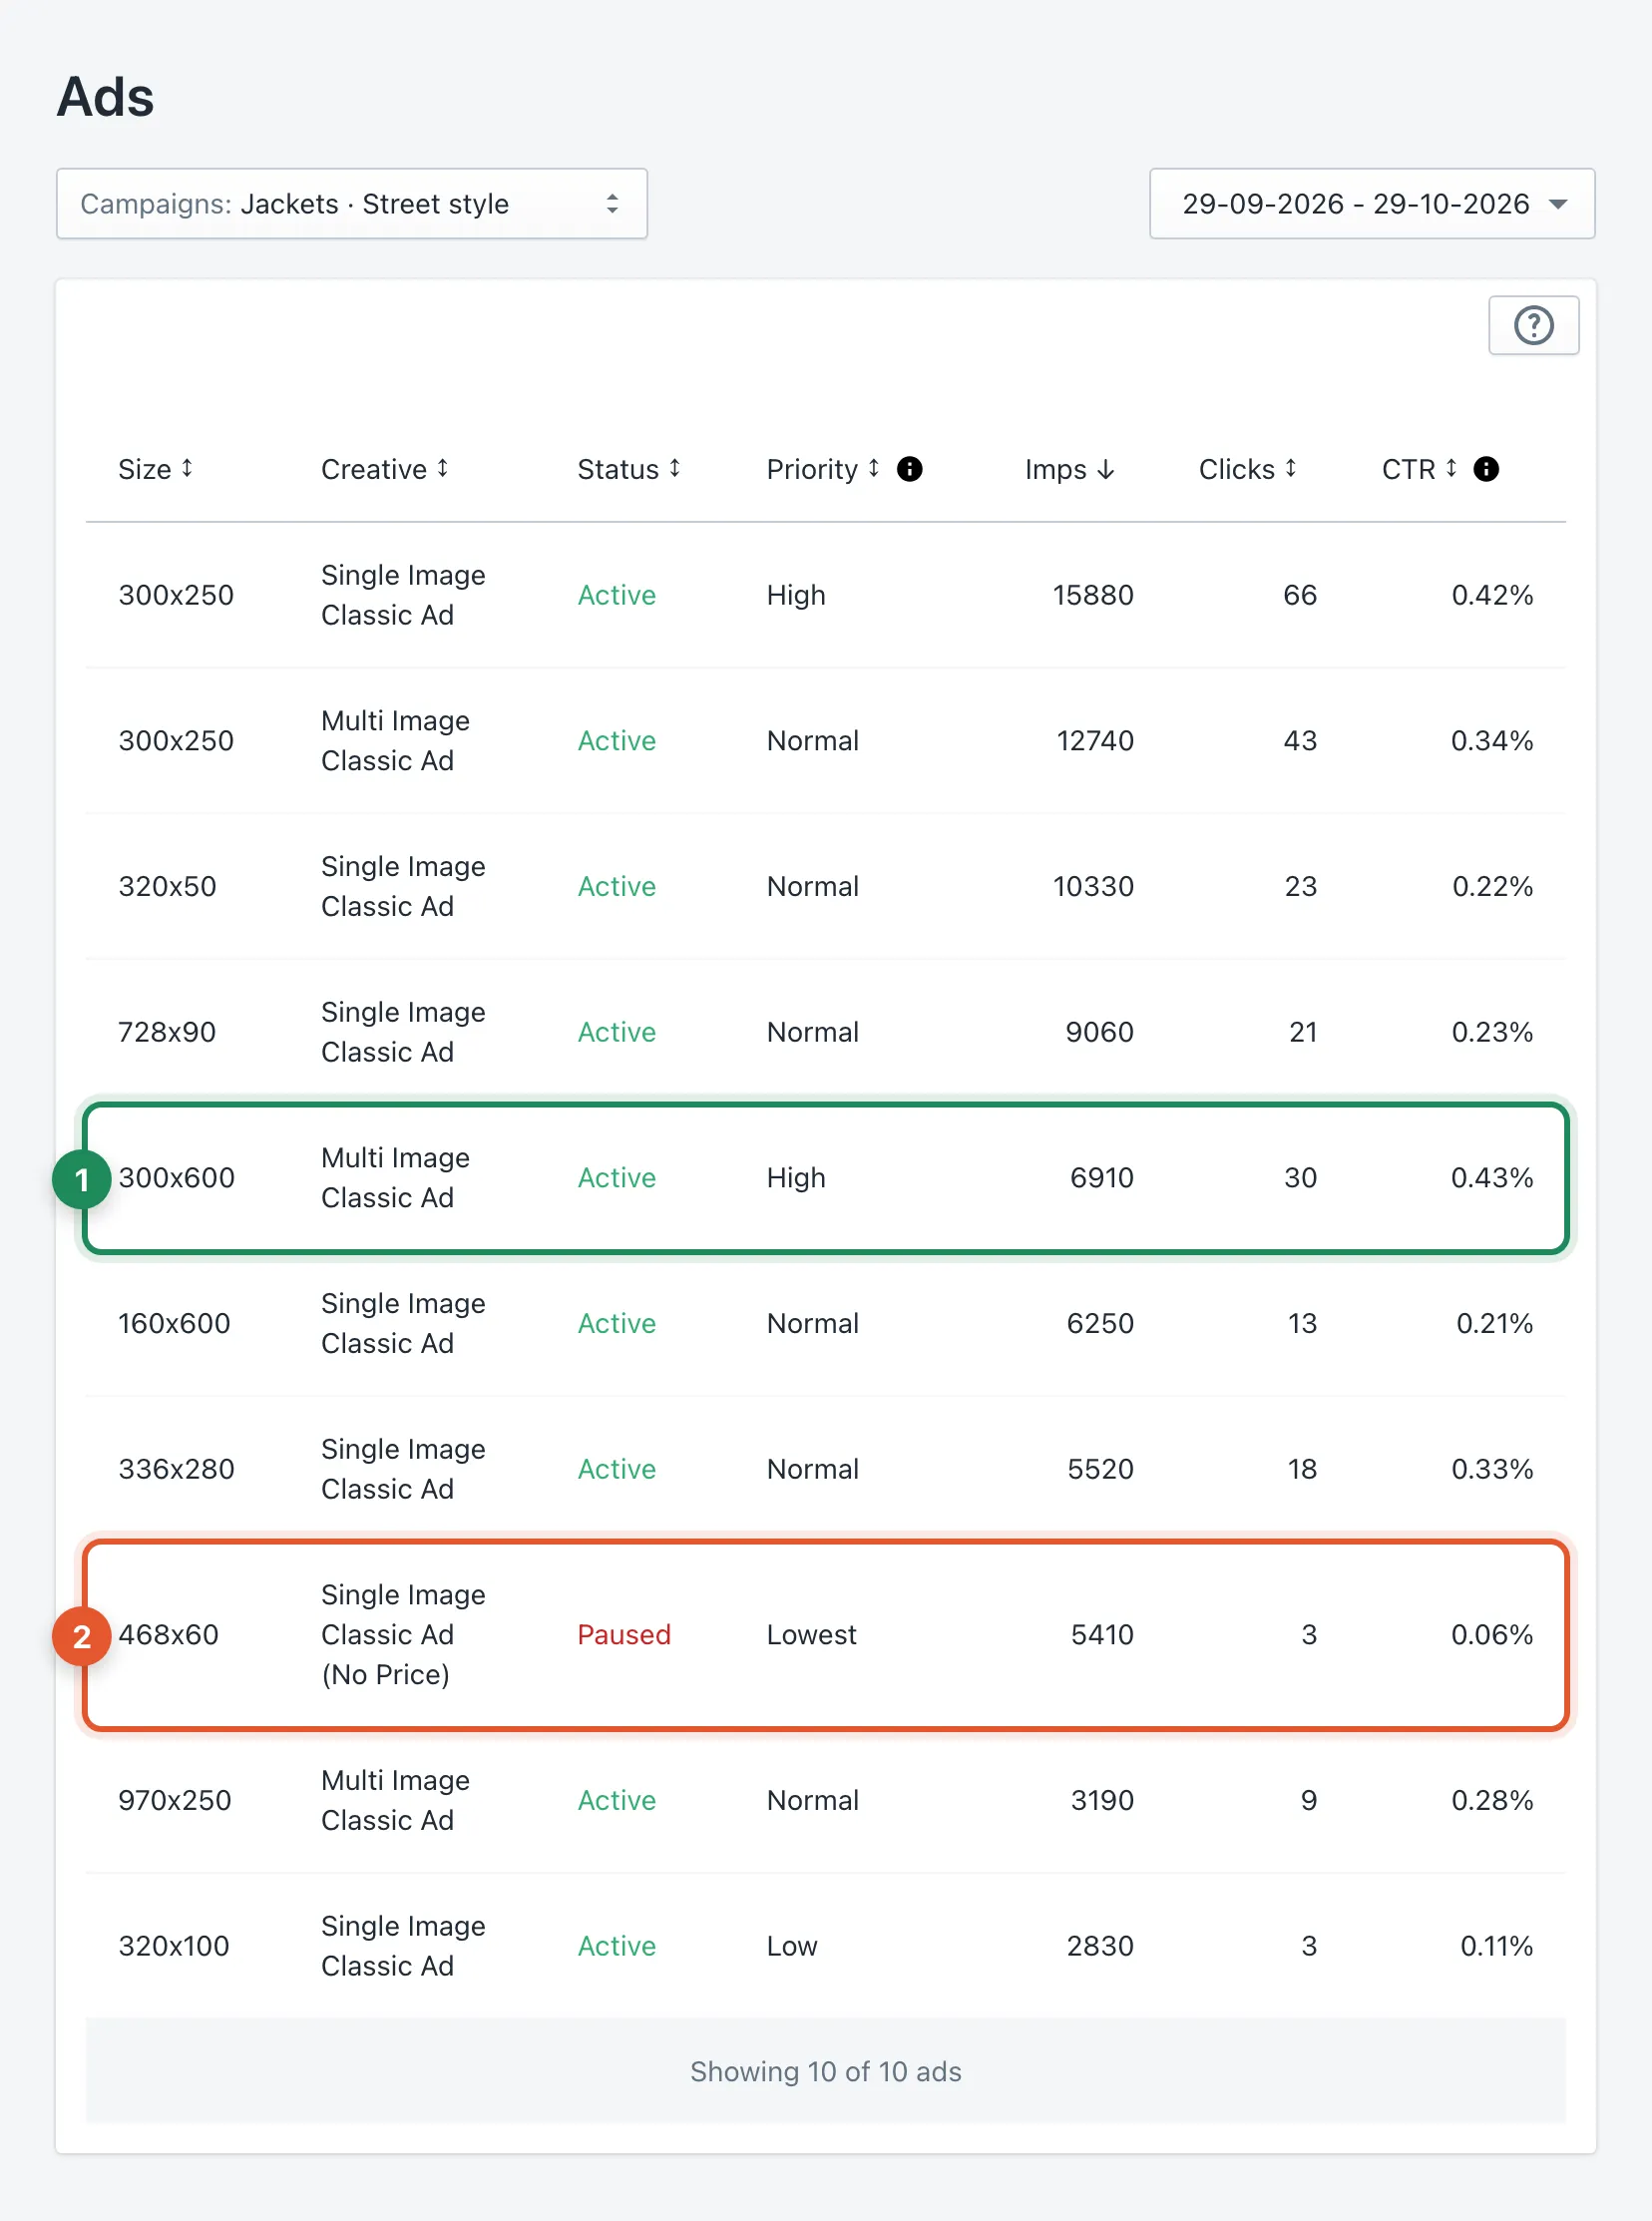
(1) A format with a clearly higher CTR earns High priority. (2) A format far below all the others after 5,000 impressions or more can be set to Low or paused. But keep most sizes active: every size you pause is a place where your ads can no longer appear.
Priorities: let the AI do it, or take the wheel
With AI optimization on, Adeagle does all of the above for you: about once a week it looks at which ads and products people click, raises their priority, lowers the weak ones and manages which formats run. For most stores that is the best choice in the learning phase.
Set priorities by hand when you know something the clicks don’t show yet - your bestseller, a product with a high margin, a seasonal hero, a product you have plenty of in stock. Give it High. One thing to know: with AI optimization on, the AI may change your priorities at its next weekly review. To keep yours, switch AI optimization off for that campaign - click the pencil in Campaigns.
Check where your visitors come from
Open Traffic Sources. It lists the websites and apps that sent you visitors. Do they fit what you sell - fashion blogs for a clothing store, cooking sites for kitchenware? Then your targeting is right. Many sources that have nothing to do with your products mean the categories or interests of a campaign are too broad. Many visitors from apps mean your products work on phones - check that your product pages load fast on mobile.
Week 3: move budget toward what works
Now you have three weeks of clicks, and often the first orders. Open Campaigns and compare your campaigns side by side: CTR, clicks, orders, revenue, spend and ROAS (return on ad spend - revenue divided by spend).
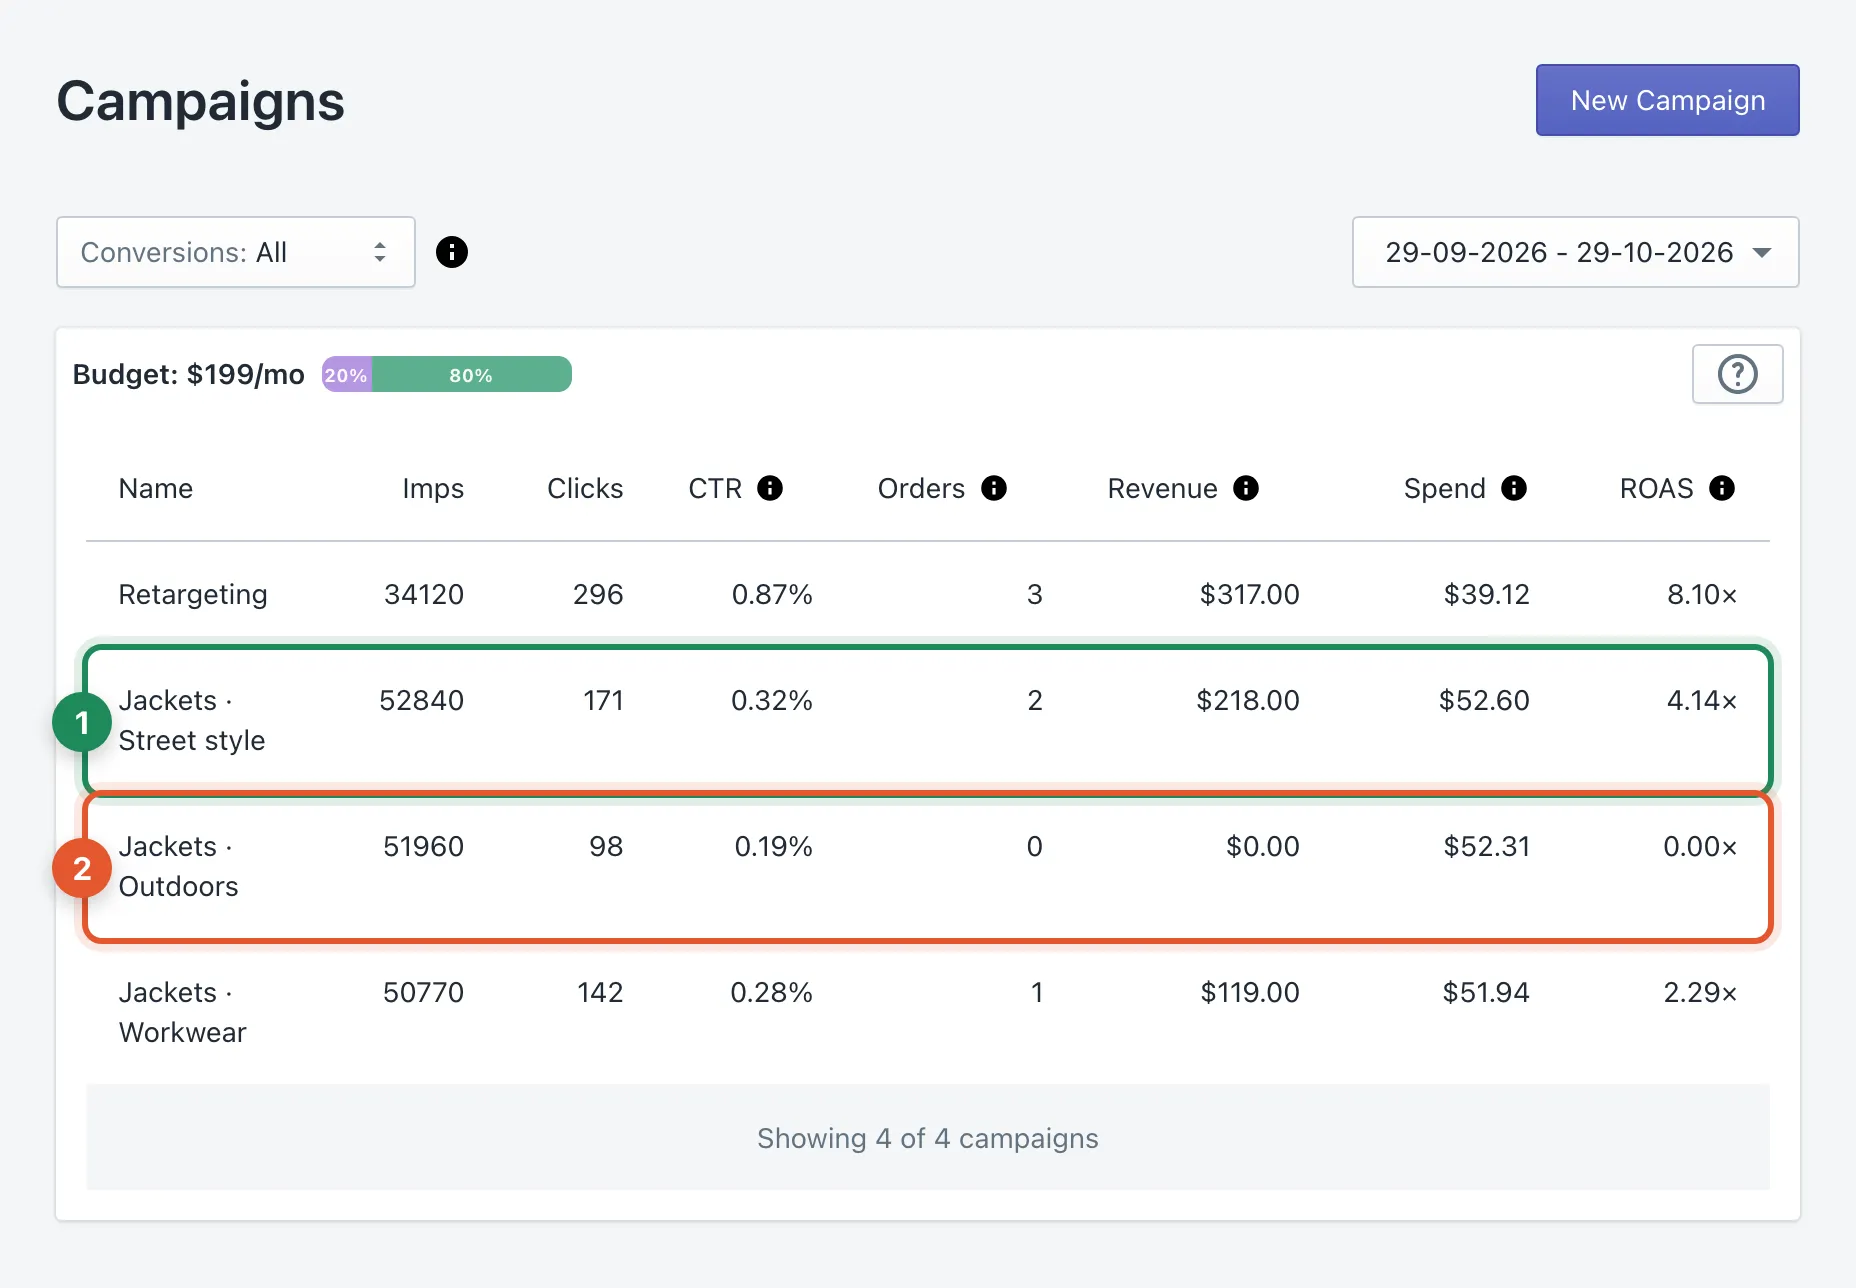
The three jacket campaigns have the same products, but their results differ. (1) Street style gets the most clicks and the best return of the three. (2) Outdoors gets the fewest clicks and no order yet. Workwear sits in between. Notice also the Retargeting row - three times the CTR of the others, because these shoppers already know the store.
Don’t decide on orders alone yet. With two or three orders per campaign, one order more or less swings the ROAS a lot. Look at clicks and CTR together with orders. When all three point the same way, act:
- Give the winner more. In Edit Budgets, drag its slider - it becomes Manual, with a fixed share of your budget. The Auto campaigns share what is left.
- Lower the weakest - or keep its share and change its interests, so it tests a new audience. Pause it only when it is clearly behind on everything. A paused campaign’s budget moves to your other campaigns, so none of your budget is lost.
- Raise retargeting. After two or three weeks with the app embed on, your store has an audience of visitors to bring back. If retargeting has your best CTR and ROAS, raise its share from the default 20% to 25-30%. The maximum is 33%: the audience is made only of your own visitors, so it cannot use an unlimited budget.
- Or let Adeagle do it. Switch the Auto split from Evenly to By performance, and the campaigns that sell get more automatically.
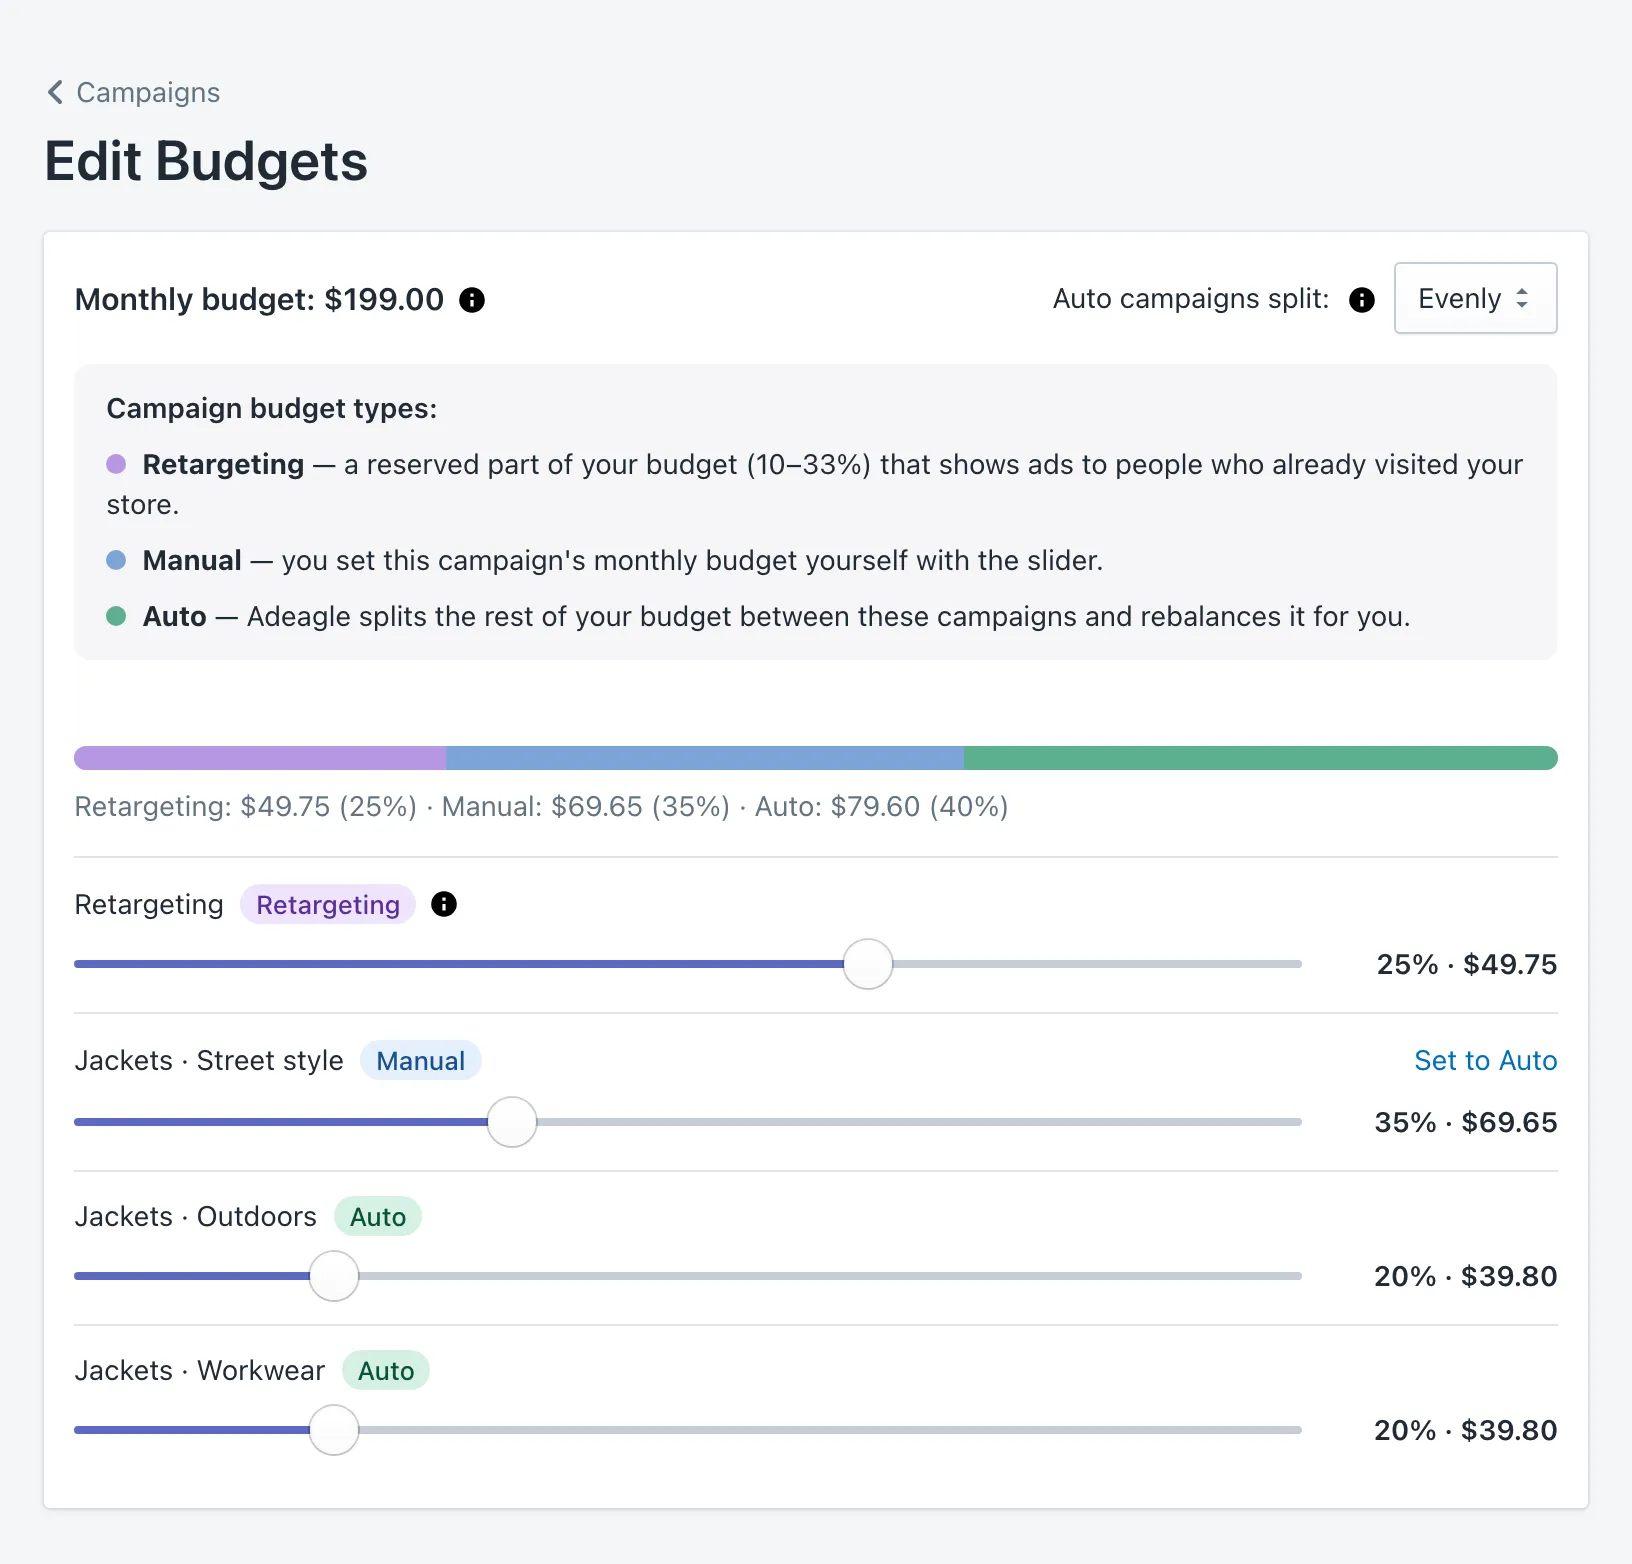
Click Save budgets - the new split starts the same day, and the checklist step Optimize your budgets pays you 1,000 free impressions. More in how per-campaign budgets work.
Should you raise the total budget? Only for what has proven it sells. Check the ROAS your margin needs to break even with the ROAS calculator. If a campaign is above it, more budget there usually means more orders.
Weeks 3-5: why the first sales come now
If you have had few or no orders so far, read this part. Three things come together around week 3:
1. Visitors add up. By week 3 you have three weeks of ad visitors. At around 1.4%, every 70 of them bring an order on average - and many small stores reach their first 70 ad visitors only around now.
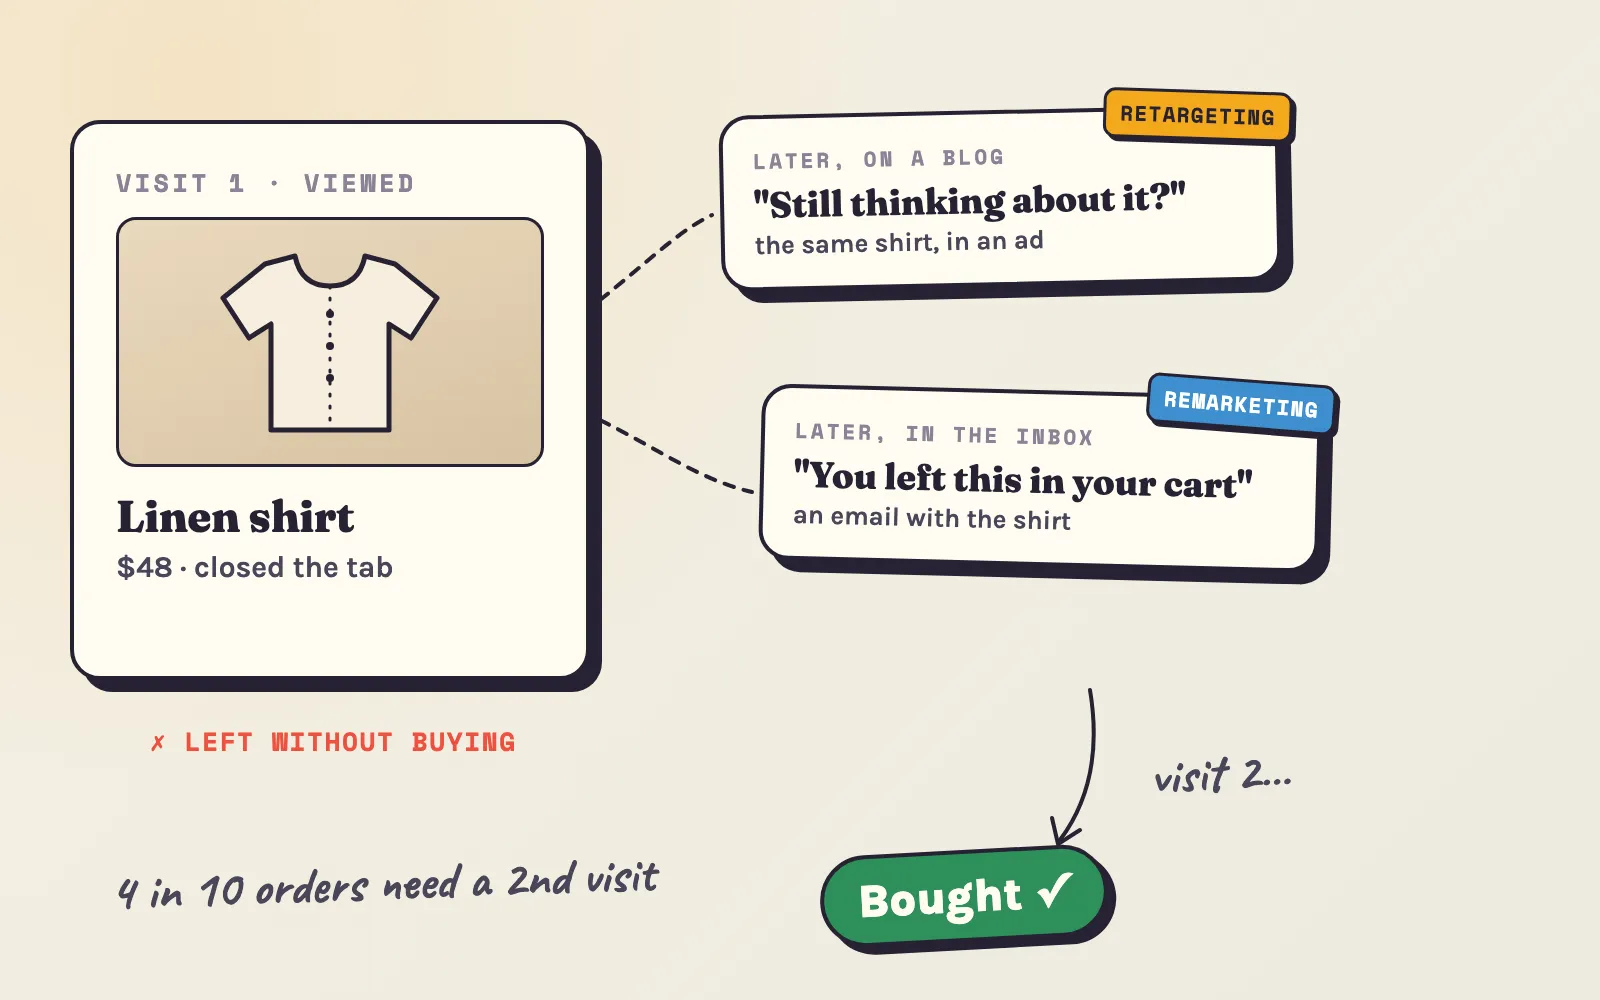
2. Shoppers come back. Most people do not buy on their first visit. They look, leave, compare and return. In a sample of 112 Shopify stores, 43% of orders (median store) came after two or more visits, and 23% after three or more. Your first-week visitors are making their second and third visits now.
3. Retargeting has an audience. Retargeting shows a visitor the products they viewed, later, on other sites and apps they use. In week 1 that audience is still small; by week 3 it holds every visitor since you switched the embed on. In our data, retargeting ads are clicked 6 to 12 times more often than ads shown to new shoppers, and bring about $16.47 in sales after a click for every 1,000 views, against $0.16 for first-time views (July-September 2026, a sample of 9 stores). More in retargeting vs remarketing.
Count the orders the right way. The Conversions menu on the Dashboard decides which orders count as Adeagle’s. All - the default - includes orders after a click and orders within 48 hours after a shopper saw your ad without clicking. Post Click and Last Click count only orders after a click. Look at more than one view before you decide; post-view conversions explains when each one is the fair one.
Week 5 and later: judge, then scale
After about five weeks you have what you need for real decisions: four weeks of numbers, a retargeting audience, and campaigns that have shown what they can do.
- Judge on four weeks, not on days. Set the date range to the last 30 days and compare each campaign’s ROAS with your break-even ROAS.
- Scale step by step. Raise the budget of what works by about 20-30% at a time and give each step a week. A jump to three times the budget brings new placements and new audiences that need their own learning.
- Start seasonal campaigns early. A campaign for Black Friday, the holidays or summer needs its own few weeks to learn. Create it two to three weeks before the season - for Black Friday, that means now.
- Refresh what tires. When a product’s CTR slowly falls month after month, give it a new photo or swap it for a newer product.
- Keep one test running. One new campaign, one new audience or one new photo at a time, one week each. Small tests add up over the months.
Optimize beyond the ads: your store
The ads bring the visitors; your store turns them into orders. Doubling your conversion rate from 1% to 2% halves what each order costs you - with the same ads and the same budget. The changes that matter most:
- Show the total price early - shipping costs and delivery time next to the price, not only at checkout.
- Reviews and proof - a product with reviews sells far better than one without. Ask your first buyers.
- Fast pages on phones - most visitors from ads arrive on a phone.
- A second chance - collect emails on the first visit and switch on Shopify’s free abandoned checkout email.
Our guide to improve your Shopify conversion rate goes through each one, with a leak finder for your own numbers.
Your checklist, week by week
- Day 1Switch onApp embed on and saved. First campaign with your best products, honest categories, 3-5 interests and the countries you ship to (none, if you ship worldwide). Plan and budget chosen.
- Days 2-3CheckImpressions and clicks on the Dashboard. Preview your ads in Ads. Fix anything that looks wrong.
- Week 1TestTwo or three more campaigns - the same collection with other categories and interests, or other collections with the same targeting. Auto split on Evenly.
- Week 2FixProducts and formats far below the others after ~5,000 impressions get a new photo or title, a lower priority or a pause. Check Traffic Sources.
- Week 3Move budgetMore for the campaign that leads on clicks and orders, less for the weakest, more for retargeting if it leads.
- Weeks 3-5Watch the first ordersCompare the Conversions views. Work on the store: price, shipping, reviews, speed.
- Week 5 and laterJudge and scaleFour weeks of ROAS against your break-even ROAS. Raise budgets in steps of 20-30%, start seasonal campaigns two to three weeks early, and keep one test running.
Mistakes that slow the learning down
- Running without the app embed. No tracking, no sales count, no retargeting audience. Check it again after every theme change.
- Judging in week 1. Too few clicks, no retargeting audience and no second visits yet.
- Changing everything at once. New photos, new interests and a new budget in the same week - and no way to tell what worked.
- Many tiny campaigns on a small budget. Each one gets a few clicks a week, and no comparison ever becomes clear.
- Targeting too narrow. One small interest in one small country reaches few shoppers and learns slowly. Start broader and narrow down with the data.
- Products you cannot sell. Out of stock, wrong price, countries you don’t ship to - pause or fix them, so no click is wasted.
- Pausing every format with a low CTR. Keep most sizes active, or your ads lose the places where they can appear.
- Expecting regular sales from 20 visitors a day. At that traffic, a quiet week is normal. Work on traffic first.
Ready to start? Add Adeagle from the Shopify App Store, follow the getting started guide, and come back to this page each week. Questions on the way? The Help Center explains every screen, and [email protected] answers the rest.
Questions
At least three weeks, and sometimes up to five - it depends on your traffic and budget. In that time Adeagle tests websites, apps, audiences and ad formats for your products, and your retargeting audience fills with visitors. The progress bar on the Dashboard moves on each day your ads run. Judge your results from week 5, on at least four weeks of numbers.
Because most shoppers do not buy on their first visit, and one order takes about 70 visitors at an average conversion rate of 1.4%. In the first week your store has few ad visitors and only a small retargeting audience. In our data, the first order from the ads came after 19 days at the median store.
Usually not. Two weeks are rarely enough data for a fair verdict on orders. Look at its clicks and CTR next to your other campaigns. If it is clearly the weakest after three weeks, lower its budget share or change its interests before you pause it.
Yes. Fix what is clearly wrong at any time - a product out of stock, a wrong price, a country you do not ship to. Change one thing at a time and give each change about a week, so you can see what it did.
No. The progress bar does not restart when you edit a campaign. But a new campaign, or new interests, need their own data, so give them their own few weeks before you compare them with the others.
About 100 a day from all your channels together. At an average conversion rate of 1.4%, that is about 42 orders a month and orders on three days out of four. With 20 visitors a day, a whole week without an order is normal.
Only when you know something the numbers do not show yet, such as your bestseller, a product with a high margin or a seasonal hero. With AI optimization on, Adeagle adjusts priorities for you about once a week. To keep your own priorities, switch AI optimization off for that campaign.